Setup with Ease and Stay Connected
Cudy Router Setup is Quick and Simple; this is where your dependable Wi-Fi journey begins.
From Unpacking to Secure Cudy Router Setup Network
Users looking for dependable, high-performance networking solutions for both home and office settings are increasingly choosing Cudy routers. This thorough guide will assist you at every stage, whether you’re configuring your first Cudy router or optimizing its settings for better performance.
We will demonstrate how to use the Cudy Router Setup app, lead you through the whole setup process, and explain how to access and change key Cudy router settings. We will also illustrate you how to configure Cudy router for the best possible connectivity. Along with many other things, you’ll learn how to safely manage your setup passwords, activate VPN functions, and solve typical problems.
Cudy Routers: An Overview
Cudy is renowned for providing affordable routers that don’t sacrifice functionality. Both novices and computer enthusiasts will love Cudy routers because of its capabilities, which include dual-band WiFi, parental controls, VPN support, and mobile app administration.
Among Cudy routers’ primary characteristics are:
- Tri-band or dual-band high-speed support
- Beamforming technology with MU-MIMO
- An intuitive user interface
- App-based setting and setup
- Client/server support for VPN
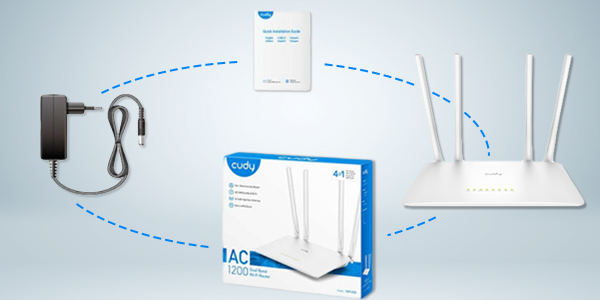
Initial Cudy Router Setup and Unboxing
When your Cudy router arrives, the packaging usually contains:
- The Cudy router.
- A power adapter
- An Ethernet cable
- A brief Cudy Router setup instruction
- Antennas, if removable
How to Install Your Cudy Router Physically:
- Install antennas if necessary: Screw the antennae in firmly.
- Connect to Power: Use the included adaptor to plug the router in.
- Connect to Modem: Attach your internet modem to the Cudy router’s WAN port using an Ethernet wire.
- Activate It: Switch on the router and watch for the LEDs to level out.
Reaching the Admin Panel of the Cudy Router
After turning on the router, you may use a web browser to enter the admin dashboard:
Steps:
- First of all, join the Cudy WiFi network with your phone or computer.
- Now launch a web browser and navigate to either http://cudy.net or http://192.168.10.1.
Enter the standard login information:
- Login name: admin
- Password: admin (for security, change this right away)
- All of the Cudy router’s settings, including WiFi, DHCP, parental controls, and VPN settings, are available to you once you’re inside.
Configuring a Cudy WiFi router setup (Basic and Advanced)
Simple Wireless Configuration:
- Firstly, navigate to the admin panel’s Wireless Settings tab.
- Subsequently, configure your WiFi network name, or SSID.
- Hereafter, WPA2-PSK is the best option for security.
- Then put in a secure password.
- If compulsory, start again the router and save the alterations.
Dual-Band Configuration:
2.4GHz and 5GHz are supported by a large number of Cudy routers. You could:
- Use the same SSID for both (the optimal option is selected automatically by smart devices).
- When selecting manually, use distinct SSIDs.
Guest Network:
- At first, create a network for guests under Guest WiFi.
- Then turn on the feature.
- Subsequently, create a password and SSID.
- Lastly, limit access duration or bandwidth.
Configuring the Cudy Router settings
More experienced users may choose to explore the Cudy router settings in further detail:
DHCP and Static IP:
- To allocate IP addresses automatically, enable DHCP.
- Configure servers and printers using static IP addresses.
- Go to NAT Forwarding > Port Forwarding to enable port forwarding.
- For services like web servers, gaming, and remote access, add a new rule.
Parental controls:
- Restrict internet usage according to timetables or prohibited websites.
- Managing traffic priority is known as bandwidth control (QoS).
- Increase the bandwidth available for business or streaming apps.
Security and Firewall:
- Turn on or off the firewall
- Block particular MAC addresse
- Set up DoS defence.
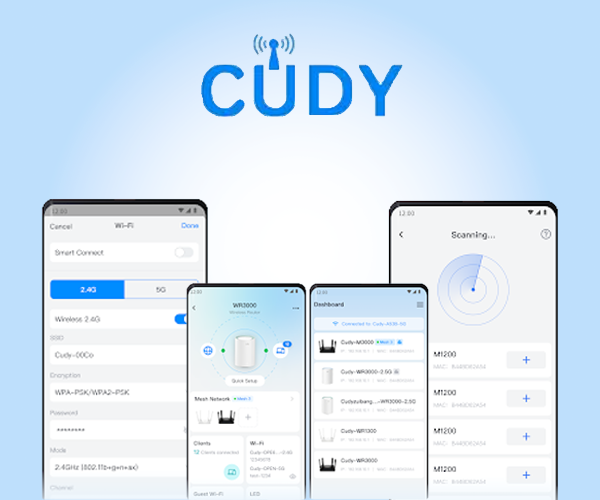
Utilizing the Cudy Router Configuration App
The Cudy Router Setup App, which is compatible with iOS and Android, simplifies router management from mobile devices.
Features of the application:
- Simple setup instructions
- Device monitoring in real time
- Adjust the WiFi configuration
- Set up guest access.
- Turn on parental restrictions or a VPN.
- A simple tap can update the firmware.
How to Apply:
- Get the app from the App Store.
- Join your Cudy wireless network.
- Open the application and enter your admin credentials to log in.
- To manage settings, adhere to the on-screen directions.
Modifying the Cudy router setup password
Changing the WiFi password and the default Cudy Login is crucial for security.
- Enter your admin password to access the online panel.
- Navigate to Admin Settings under System Settings.
- Modify the administrator’s password.
- Go to Wireless Settings to find your WiFi keyword.
- Under Wireless Security, type a new password.
- Save your modifications.
Using a mix of capital and lowercase letters, numerals, and symbols is a smart idea.
Cudy Router VPN Setup:
A virtual private network, or VPN, offers an additional degree of protection and anonymity.
VPN Client Configuration:
To enable your Cudy router to establish a connection with a VPN service (such as NordVPN, ExpressVPN, etc.):
- In the admin panel, select VPN > VPN Client.
- Choose from OpenVPN, L2TP, or PPTP as your VPN type.
- Pass in your VPN provider’s server address, username, and password.
- If necessary, upload the OpenVPN configuration file.
- Connect and save.
Setting up a VPN server:
If you want distant users to utilize a VPN to access your home network:
- Navigate to VPN Server.
- Turn on the VPN server (choose between PPTP and L2TP).
- Configure the user’s credentials.
- If necessary, set up port forwarding on your modem.
- Check the connection with a different device.
- Safe browsing, particularly on public networks, is ensured by configuring the Cudy router’s VPN settings.
Update the Cudy Router's Firmware
How a Cudy Router Can Be Reset
Resolving Typical Problems with Cudy Router setup
Here are some typical issues consumers run into when setting up their Cudy router, along with solutions.
Inability to Access Admin Page:
- Verify that you are linked to the Cudy WiFi.
- Try cudy.net and 192.168.10.1.
- Restart both your browser and your router.
- Switch devices or clear the cache on your browser.
If WiFi isn’t working
- Try restarting the router.
- Verify that WiFi is turned on in the admin panel.
- Look for firmware upgrades.
Slow Internet:
- Position the router in the middle of your house.
- Reduce the amount of interference from neighboring devices or walls.
- Prioritize important apps by adjusting QoS settings.
VPN Not Connecting:
- Check your credentials and server address.
- Try a VPN protocol that is different.
- Verify compatibility with your VPN provider.
FAQs
What are the default settings for a Cudy router?
The username and keyword are both set to “admin,” and the IP address is 192.168.10.1 by default. The router’s label bears the Wi-Fi SSID and associated password.
How do I change my Wi-Fi password on a Cudy router?
Navigate to Wireless Settings and then Wireless Security subsequently logging into the router admin panel. If prompted, restart the router, save the configurations, and enter a new password.
How do I configure VPN on my Cudy router?
To enable VPN, go to the admin interface’s VPN area, select VPN client or server mode, enter your login information or upload the configuration file, and then click Connect.
Can I set up a Cudy router as a repeater or access point?
Indeed. Navigate to the admin panel’s Operation Mode settings, choose Repeater or Access Point mode, adhere to the instructions, and then connect the router to your current network.
How do I configure DNS settings on a Cudy router?
Locate the DNS fields under Network Settings > WAN or LAN settings, manually insert your favorite DNS servers, such as Google (8.8.8.8), save, and reboot if necessary.
Why is my Cudy router not connecting to the internet after setup?
Verify the WAN settings (DHCP, PPPoE, etc.), make sure the Ethernet connection is connected correctly, then restart the modem and router. Make sure your ISP credentials are accurate as well.